Editing

Animating Lumbrical Flexion by Kyle Rebar

I had a HIGHLY productive music day in 2022, wrote five instrumentals in one day trying to score a yoga anatomy video for my friend Nam…I fell in love with all of the music. Spent some time working the scored “background music” versions into listenable songs. I posted the songs as an ep and let them sit on the backburner…UNTIL I TOOK A HISTORY OF ANIMATION CLASS. We learned about traditional animation techniques, I posted about wanting to try it in a class discussion, and the professor called my bluff… “GO DO IT, KYLE!”

I’d spent the previous year filming and editing for a fine art education website. Hanging out with amazing watercolorists got the inspiration soup to a roiling boil and I wanted to try it. Didn’t know what to animate, though. Knew my baseline skills were quite low (stick figures, mostly). Needed to find a project that would help develop baseline skills that I couldn’t possibly overcomplicate. Noticed how much time social media and phone devoured. Needed to get away from that thing. Also HATE AI art and needed to rebel against the “just have the robot generate it” trend. Needed to make something with my hands like the troglodyte neanderthal I am.

I was also taking an intro to drawing class around this time. We had an assignment to draw five hand gestures…Nam’s yoga video was all about gripping the floor during handstands using a precise muscular action. LIGHTNING BOLT! I’d use Nam’s lumbrical flexion video as a starting point, would draw a heap of hand gestures, and set them to the a Lumbrical Flexion song—II - Imagine an Imaginary Toothpick, if you’re wondering…because the action you take to grip the floor is like if you were to grip a toothpick straight up with only the palm of your hand.

Brought the sketchbook whenever I’d go for coffee, open mic, beers, train rides, etc. Spent time reserved for social media drawing hands. Did this for an entire year. Got restless and wanted to see it move. Couldn’t do all of the transfers at once and knew I’d have to draw some in-betweens between poses when I changed sketchbooks, forgot what I was doing, or inspiration carried me elsewhere. I marked off a spot on my desk with tape around the sketch book. Flattened the unruly ones with an acrylic sheet and kettlebell. Set up my trusty Panasonic Lumix S5 overhead on a C-stand. Flanked the sketchbook with two big panel lights (my mentor Annie Killam uses this technique to get dramatic lighting for yoga photoshoots—turns out it works for page lighting. Physically hitting the shutter each time would shake the C-stand, so I connected the camera to an iPad and controlled it with the Lumix Image app. No shakes!

Dropped the images into Premiere and adjusted the speed…Only had about a third of the material needed. Decided this video needed a nerdy science joke, so I added a scene where we zoom in to a flipping off gesture’s middle finger nail. Zoom to microscope view. Zoom to bacteria view. Zoom to chemical chain view of beta keratin (the stuff your fingernails are made of). Zoom to atomic level. Zoom to SUBatomic level. At this point, I became frustrated with photographing all of the drawings and switched to Procreate 🤷. Only added five seconds of footage, though!

Cheesed through the next chunk by watercoloring over all of the pencil drawings. I love Electric Soldier Porygon, so I painted each frame different to look jarring went slapped together. Needed to fill more time, so I overlayed watercolor frames with different blendmodes and adjusted the timing to be really trippy.

Still needed some connecting bits, so I messed around in Blender. Modeled a low-poly hand. Rigged it with tips from my pal Julian. Unsuccessfully attempted webcam motion capture. Messed around with different poses to fill in the gaps. Then, I whacked it all the way out for fun.

I sometimes forget to give context to my works and wanted to avoid that pitfall. Filmed an intro of me watching Nam’s video, kicking up into a handstand, then transitioning into the animation. Wanted to show off and show the action of lumbrical flexion. Made a platform out of some yoga blocks and a clear acrylic sheet, pointed the camera up from beneath the clear platform. Hindsight, I could have shortened up this segment, but whatever. It’s done and I stand by it, god donut. Enjoy!

How to Create Simple Dice Roll Animations with Blender by Kyle Rebar

I do a fair amount of freelance work in the nerd-therapy community filming panels about fandom psychology at various comic cons around SoCal. The brands I’d worked for in the past have been largely minimal and refined—think “Apple Store” aesthetic and not giving “let’s do therapy with the villains at Arkham Asylum!” I wanted to have some fun with the latest round of panels from Los Angeles Comic Con, so I decided to create some simple title animations using Blender. I’ll breakdown some of the others in future posts.

3D Dice Roll Animation with Blender

This first animation was pretty fun to build. I wanted to “roll for initiative” with From Initiative to Self Determination: Using RPG’s as a Therapeutic Tool. You can do this with simple rigid body physics and basic meshes in Blender (I’m using Blender 4.0 for all of these). I’m not an advanced user by any means, so I’ll write for a beginner’s skill level.

Delete the basic starter cube and a plane. Scale it up big. This will be the “ground” that your dice roll on. To make the plane act as the ground, select the object ➡️ go to the physics tab ➡️ Rigid Body ➡️ Set Type to Passive.

Next, you’ll need to add the dice. Right out the box, you’ll notice that Blender only has a few shapes in the Add Meshes Menu (Shift + A). Do Edit ➡️ Preferences ➡️ Add-Ons ➡️ and enable Add Mesh: Extra Objects .

Next, do Add Mesh ➡️ Math Function (😱MATH!!!😱) ➡️ Regular Solid. This will bring up a menu that allows to generate different basic shapes…Tetrahedron, hexahedron, octahedron, dodecahedron, icosahedron… ie, THE FLAVORS OF DICE YOU WOULD USE IN A TABLE TOP RPG!

Add as many dice objects as you want. I went with a nice a d4, d8, & d10 because they read well at a small final size. We’ll need to add these objects to the rigid body system.

Go into the physics tab for each ➡️ enable Rigid Body ➡️ set Rigid Body to Active (this means the object will move and bounce… ie, is not the ground or a wall). We’ll play around with friction, bounciness, and mass later.

Move you dice up into the “air” on the z-axis. Play the animation. Right now, they just fall from the sky and bounce. I wanted this to look like a proper roll… Someone holds the dice, swings their arm through space, opens their hand, and the dice spill out on the table, bounce a few times, and land on one side.

The beauty of 3D is that there are a million ways to achieve a look. Initially, I thought I could keyframe the dice to mimic the throw and physics would do the rest. That proved to be way beyond my skill level. HOWEVER, there’s an easier way. You can achieve a close enough look by simply having your dice roll off a sloped surface…which is pretty much what happens in an IRL dice throw.

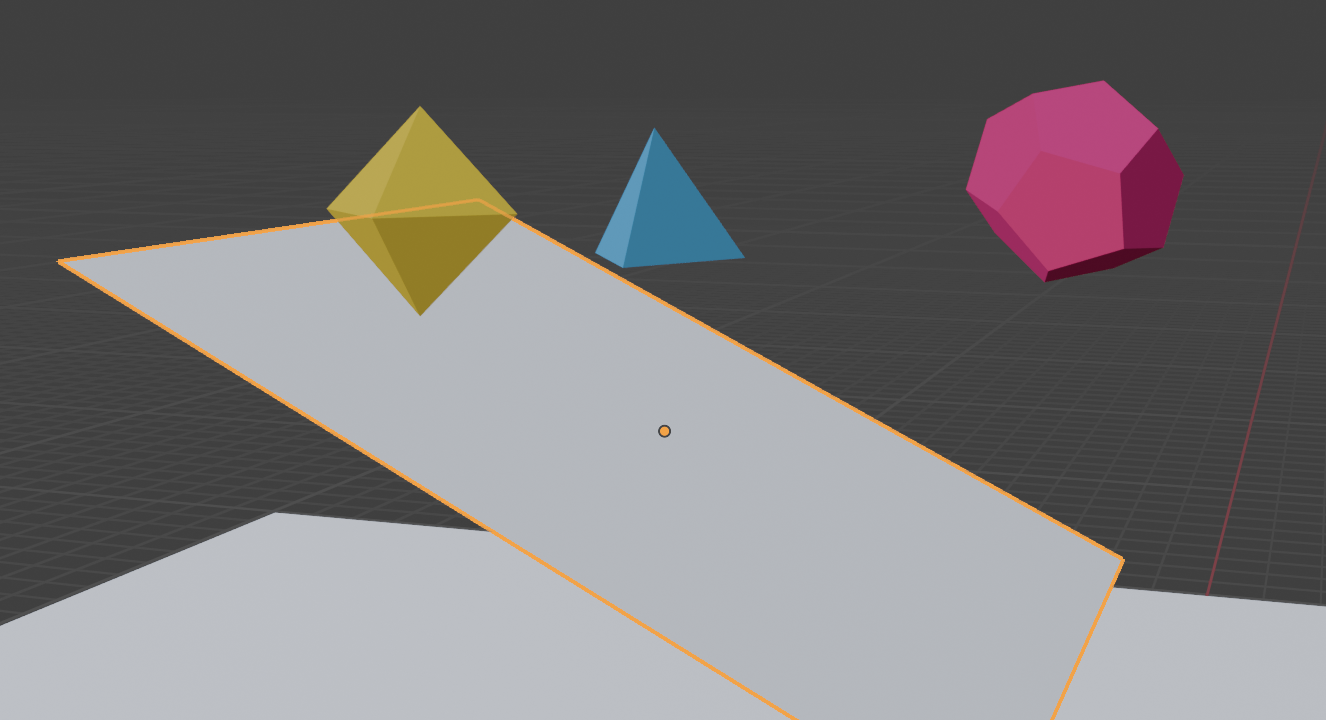
To do this, add another plane. Scale it up so there’s enough surface for your dice to roll on. Move it up into the air on the Z-axis. Rotate it on the X & Y to get the desired slope. Add the same physics properties as your ground plane (you could just duplicate the mesh with SHIFT + D / Alt + D for linked objects).

Position it under your dice. Play the animation! What do you notice?

With default settings, your dice are probably bouncing around all over the place. This next part is really trial and error. You’ll need to play with the positioning, mass, friction, and bounciness settings under the rigid body tab until it looks right. If it’s still not behaving right, you can add Collision physics and tweak those settings. Admittedly, I forget exactly what this does, but I have it in my simulation 😅.

When you’re getting ready to render your scene, you may want to hide your ground and slope. To do this, go to the Outliner Panel and disable the camera icon for the plane objects. When you render, Blender will omit those objects.

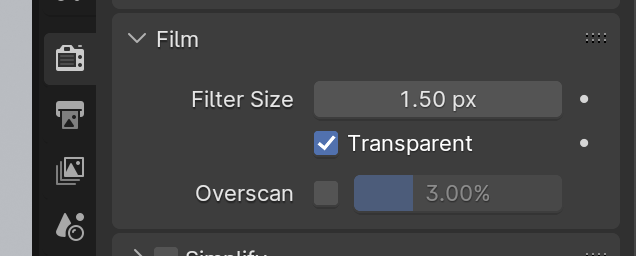
If you want to add a background later or superimpose the dice over other footage (say in Premiere), you’ll need to enable transparency in your render. To do this, go the Render Tab ➡️ Film ➡️ enable Transparent. This will give you an alpha channel in your PNG exports.

Speaking of exports, you may notice some weirdness when you go to render an .mp4 out of Blender like you would in Premiere or After Effects. I’ve found that the quickest and most fool-proof way to get your scenes out of Blender is to export as a series of PNGs.

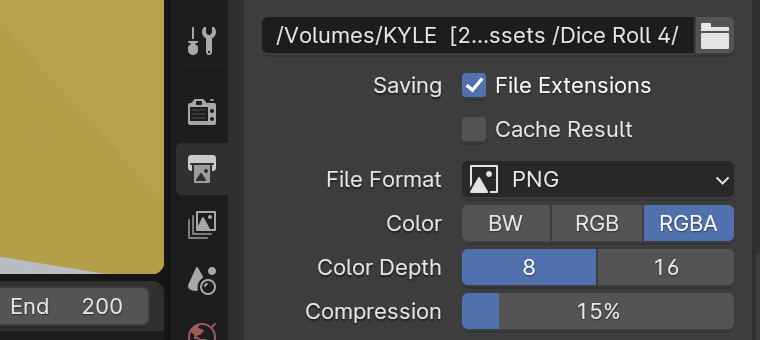
Go to the Output tab ➡️ Format ➡️ File Format ➡️ Color ➡️ RGBA.

Every frame becomes one png, then you import those as an Image Sequence in your editing software.

Here’s how the simulation looks on my end! I wound up going with a pixel look for all of the panels I filmed this time. I’m a 90s kid, what can I say? Also, pixels can help cover sloppiness in your animations and simulations…something I really appreciate about stylized aesthetics.

Acknowledgemetns

No one exists in a vacuum. Blender is notoriously confusing at first glance. Fortunately, there are a tonnnnnn of tutorials floating around to help you figure stuff out. I usually do piecemeal searches… “How do I enable add-ons, how do I make two objects collide, etc.” For this blog, I learned how to add Math Function Meshes from this tutorial by Cly Faker.

Special thanks to Charlene MacPherson from NAT20 Therapy for having me on this project!

Go forth and conquer, friends!