How To

How to Donate Leftover Food on a Film Set by Kyle Rebar

I’ve been freelancing as a Sustainability Coordinator and Sustainability Production Assistant on commercials for the past two years. One thing I noticed almost immediately is that these productions create a colossal amount of food waste.

When a production hires a sustainability team, most of the food waste gets composted. When a production doesn’t, it all goes into the landfill. We’re not talking just a little bit. I was on a job last year that produced 3700 lbs of trash in a week. Of that, 2200 lbs was compost (food waste), 800 was landfill, 400 recycling. We were able to donate 300 lbs of food to local shelters.

This isn’t only relevant for production workers in Los Angeles. I think the broader message of waste reduction and considering the mess we create is applicable to anyone. Have a company party with seven leftover pizzas and a table full of soda? This post can help you get that food to folks in need!

Why Donate Food?

I’ve been studying environmental science and sustainability at Santa Monica College since 2021. One thing that popped up in Environmental Economics class is that the world produces more than enough food to feed everyone. Yet the US wasted 133 billion pounds of food in 2010 alone. California produces 6 million tons of food waste every year and SB 1383 aims to slash that number…which is why you might be seeing more green bins around town and sustainability people on set.

If statistics don’t “do it” for you, look around next time you take a walk around your neighborhood in LA.

Where Does All of that Food Come from?

Productions have to feed a lot of people. Catering typically over cooks so there’s more than enough for everyone. Most of the extra can’t be reused or saved. Craft services also gives out snacks throughout the very long shoot days. This all adds up. People often take extra food and throw away the scraps. Some cooking waste isn’t particularly palatable (e.g. beef juice). Food styling often overbuys so there’s plenty of items to dress a set with.

Composting requires energy to transport and process. According to a guest lecture from a representative from Athens Services in Sustainable Food Systems class, most of LA’s compost gets sold to farms in Kern County or used as landfill cover locally. The best thing to do with edible food is to turn it into calories by letting someone eat it. Here’s how you can make that happen.

Getting the Leftovers

If you have a sustainability team on set, come chat us up! We love to talk with like-minded folks. If you don’t have sustainability team, it’s time to take matters into your own hands.

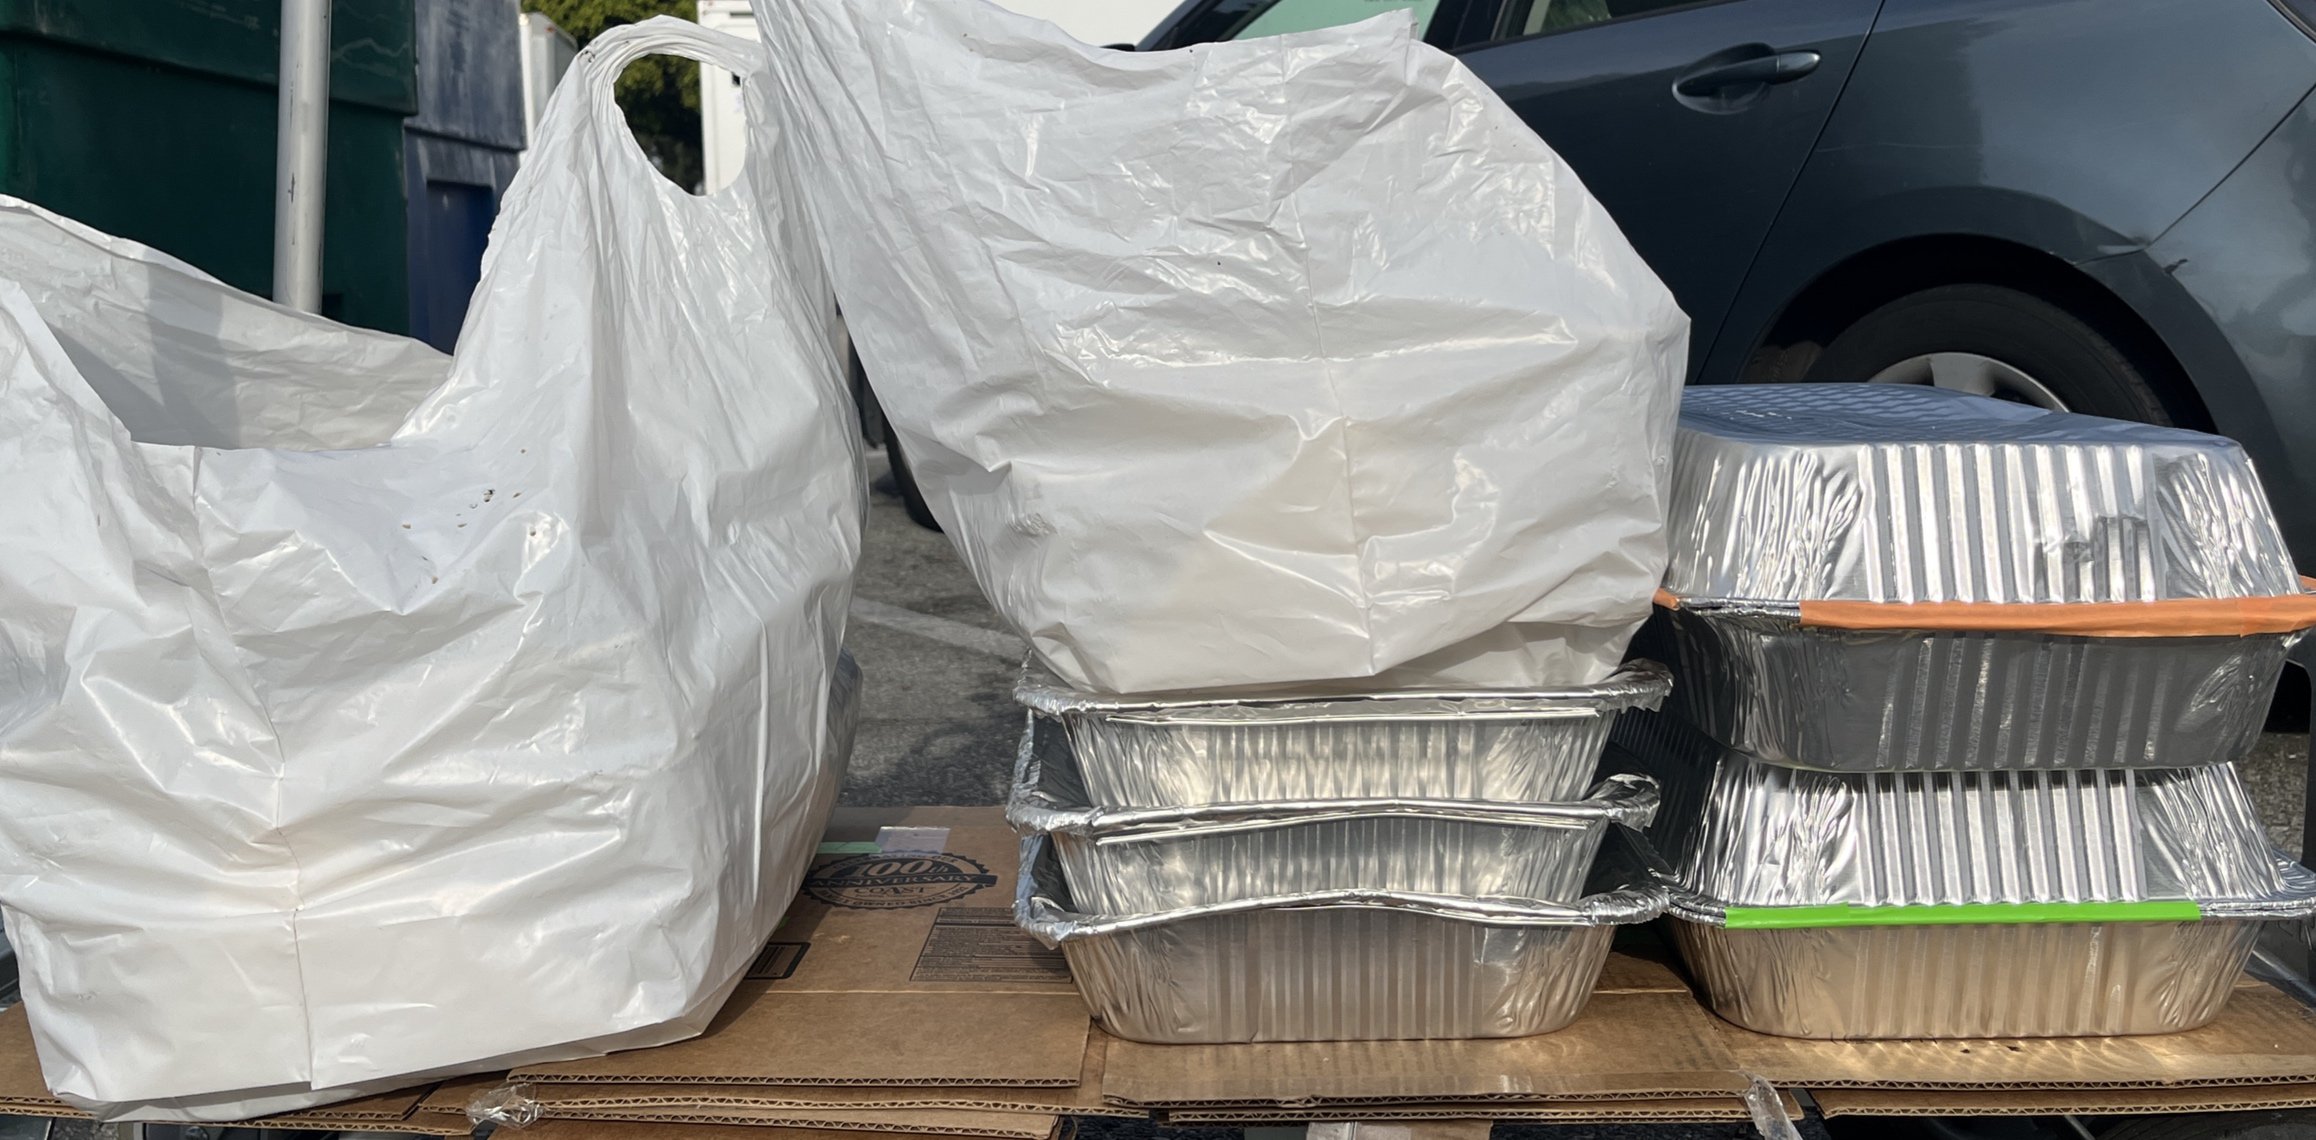
It’s rare that you won’t have leftover food on a shoot day. Talk to your production supervisor about getting some aluminum food pans with lids. Aluminum is more recyclable than plastic, so go that route if you can. Typically, I plan for 5-10 pans a day, depending on if I can get both breakfast and lunch donations. This should run production about $10 / day—a drop in the bucket for most budgets.

Once you’ve secured pans, talk to your caterers. Let them know you’re going to donate any leftover food to a nearby shelter—protein, salads, pastries…anything you can eat that would otherwise go into the trash. I’ve found that folks are almost always super down to help you out and will usually fill up pans for you. You may need to fill ‘em up yourself once they’ve finished serving. Caterers are busy and folks are usually most receptive to sustainability when you can make their jobs easier.

Donate to a Nonprofit

By far the easiest way to get your food to folks in need is to reach out to a nonprofit like Every Day Action. EDA has a team of drivers and volunteers who will come to you to pick up and donate your food. You can set up pick ups via email, and they have a network of shelters in each neighborhood so the food gets redistributed locally. If you’re looking for an organization to donate money to, I would highly recommend EDA.

Let’s say you can’t get an EDA pick up…what then?

DIY Food Donation

There are lots of places that will accept food if you know where to look. You can start by Googling “shelters near me” and cold calling. My favorite place to donate to is the Midnight Mission in DTLA. They accept donations all night, so if production runs late, you have a place to drop off. If you live in LA, I would recommend checking this place out, it’s quite sobering. They’re centrally located to lots of studios, too.

Food pantries will often accept donations, but may have limited availability. Nourish.la and Bodega at Santa Monica College are two that I’ll contact when I’m working in their neighborhoods.

If you can’t find a shelter, I’ve found that fire departments love getting proteins. “30 lbs of ribs? Yes please!”

Liability

One question that comes up a lot is food donation liability… “Will I get in trouble if I donate this food?” California has a 2017 Good Samaritan Law that will protect you if you donate food that was fit for consumption at the time of donation to a food bank or non-profit. At the federal level, the 1996 Bill Emerson Good Samaritan Food Donation Act offers similar protections if you donate in good faith to a nonprofit organization. I’m not a legal expert by any means, but I haven’t run into any problems so far.

To be safe, make sure that you refrigerate or chill any food that’s going to be left out for a while, say if your pick up driver won’t arrive until after lunch and you’ve already collected breakfast. Catering, food styling, and crafty will usually help you out.

Food for Thought

You might feel unsafe if you’re dropping off food by yourself and there’s a large crowd of people outside of a shelter. Don’t ever put yourself in a dangerous situation. The Midnight Mission has a guarded, underground entrance you can use after hours. I’ll usually wait until the morning to drop off food if crew gets a late second meal and I can’t arrange a pick up. Along those lines…

There’s a common sentiment among some folks in LA that “don’t want those people around.” To that I say fix your heart. LA county has roughly 75,000 unhoused people, which is coincidentally the same population as my hometown of Scranton, PA. It’s not just unhoused people that need food. According to a USC study, 30% of households in LA experience food insecurity. We’re all complicit in a system that allows this to happen. We can drown in apathy or look for ways to make an impact. Talk to people. Someone will likely help you help others.

Acknowledgements

I have to give a huge shout out to EcoSet, a sustainability consulting company I freelance with, and their senior coordinator Nik Li. I have learned sooo many practical sustainability practices from them and love getting to brainstorm ways to improve our practices with Nik. Definitely check out their warehouse if you’re a filmmaker—they’ve got loads of amazing salvaged props, furniture, wood, art supplies, walls, and a-frames that you can just take for free.

Prof. Grebler from Santa Monica College is heavily involved in their sustainability certificate programs, runs a volunteer gardening group, and teaches an amazing food anthropology class. She’s been an invaluable support and resource as I learn more about sustainability and food waste reduction in Los Angeles.

Thanks to Leah Kim—helping out with her Voices on the Side podcast encouraged me to lean into uncomfortable discussions for the greater good.

Thanks to Kat Heagberg for editing these posts!

Finally, a mountain of thanks to Every Day Action for they work do.
Go Forth and Conquer Food Waste!

How to Create Simple Dice Roll Animations with Blender by Kyle Rebar

I do a fair amount of freelance work in the nerd-therapy community filming panels about fandom psychology at various comic cons around SoCal. The brands I’d worked for in the past have been largely minimal and refined—think “Apple Store” aesthetic and not giving “let’s do therapy with the villains at Arkham Asylum!” I wanted to have some fun with the latest round of panels from Los Angeles Comic Con, so I decided to create some simple title animations using Blender. I’ll breakdown some of the others in future posts.

3D Dice Roll Animation with Blender

This first animation was pretty fun to build. I wanted to “roll for initiative” with From Initiative to Self Determination: Using RPG’s as a Therapeutic Tool. You can do this with simple rigid body physics and basic meshes in Blender (I’m using Blender 4.0 for all of these). I’m not an advanced user by any means, so I’ll write for a beginner’s skill level.

Delete the basic starter cube and a plane. Scale it up big. This will be the “ground” that your dice roll on. To make the plane act as the ground, select the object ➡️ go to the physics tab ➡️ Rigid Body ➡️ Set Type to Passive.

Next, you’ll need to add the dice. Right out the box, you’ll notice that Blender only has a few shapes in the Add Meshes Menu (Shift + A). Do Edit ➡️ Preferences ➡️ Add-Ons ➡️ and enable Add Mesh: Extra Objects .

Next, do Add Mesh ➡️ Math Function (😱MATH!!!😱) ➡️ Regular Solid. This will bring up a menu that allows to generate different basic shapes…Tetrahedron, hexahedron, octahedron, dodecahedron, icosahedron… ie, THE FLAVORS OF DICE YOU WOULD USE IN A TABLE TOP RPG!

Add as many dice objects as you want. I went with a nice a d4, d8, & d10 because they read well at a small final size. We’ll need to add these objects to the rigid body system.

Go into the physics tab for each ➡️ enable Rigid Body ➡️ set Rigid Body to Active (this means the object will move and bounce… ie, is not the ground or a wall). We’ll play around with friction, bounciness, and mass later.

Move you dice up into the “air” on the z-axis. Play the animation. Right now, they just fall from the sky and bounce. I wanted this to look like a proper roll… Someone holds the dice, swings their arm through space, opens their hand, and the dice spill out on the table, bounce a few times, and land on one side.

The beauty of 3D is that there are a million ways to achieve a look. Initially, I thought I could keyframe the dice to mimic the throw and physics would do the rest. That proved to be way beyond my skill level. HOWEVER, there’s an easier way. You can achieve a close enough look by simply having your dice roll off a sloped surface…which is pretty much what happens in an IRL dice throw.

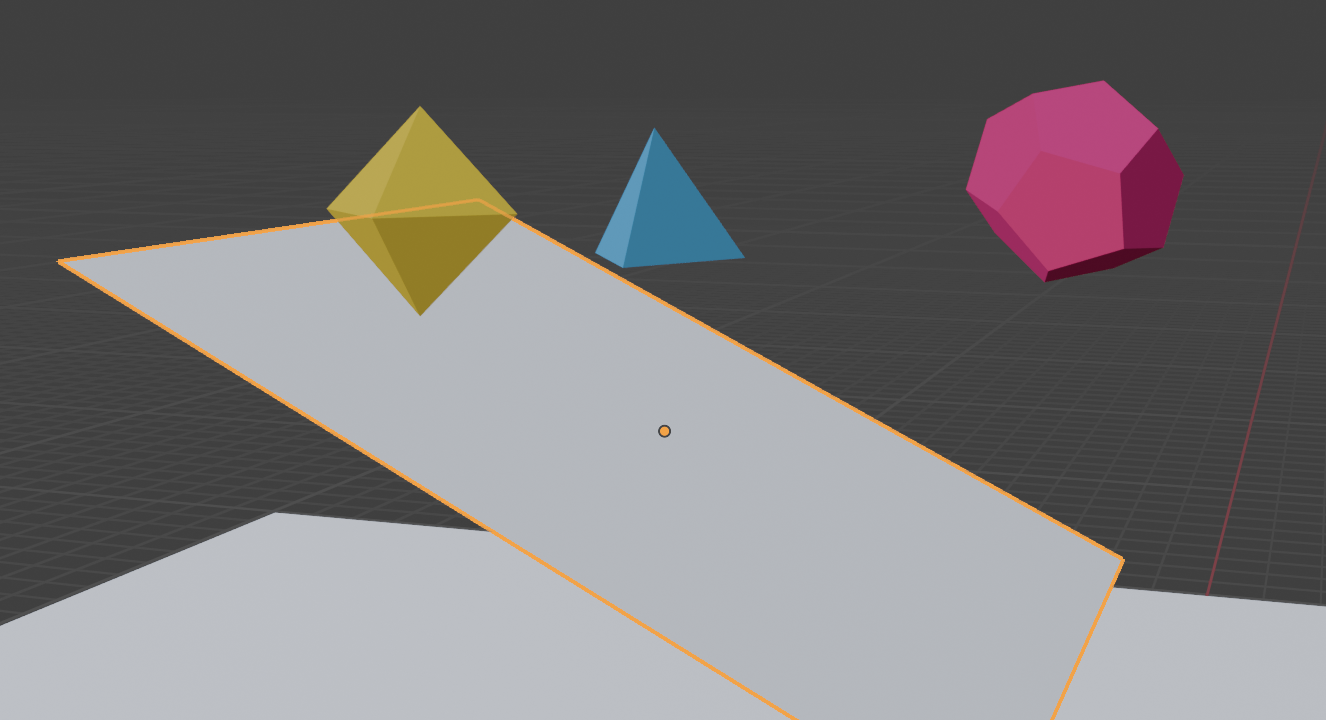
To do this, add another plane. Scale it up so there’s enough surface for your dice to roll on. Move it up into the air on the Z-axis. Rotate it on the X & Y to get the desired slope. Add the same physics properties as your ground plane (you could just duplicate the mesh with SHIFT + D / Alt + D for linked objects).

Position it under your dice. Play the animation! What do you notice?

With default settings, your dice are probably bouncing around all over the place. This next part is really trial and error. You’ll need to play with the positioning, mass, friction, and bounciness settings under the rigid body tab until it looks right. If it’s still not behaving right, you can add Collision physics and tweak those settings. Admittedly, I forget exactly what this does, but I have it in my simulation 😅.

When you’re getting ready to render your scene, you may want to hide your ground and slope. To do this, go to the Outliner Panel and disable the camera icon for the plane objects. When you render, Blender will omit those objects.

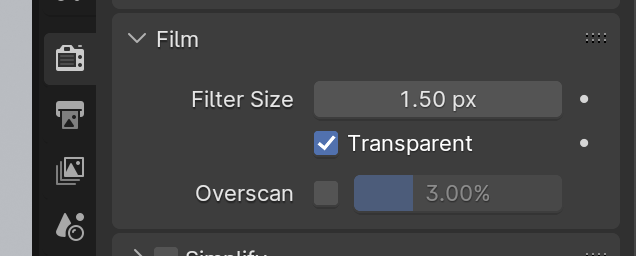
If you want to add a background later or superimpose the dice over other footage (say in Premiere), you’ll need to enable transparency in your render. To do this, go the Render Tab ➡️ Film ➡️ enable Transparent. This will give you an alpha channel in your PNG exports.

Speaking of exports, you may notice some weirdness when you go to render an .mp4 out of Blender like you would in Premiere or After Effects. I’ve found that the quickest and most fool-proof way to get your scenes out of Blender is to export as a series of PNGs.

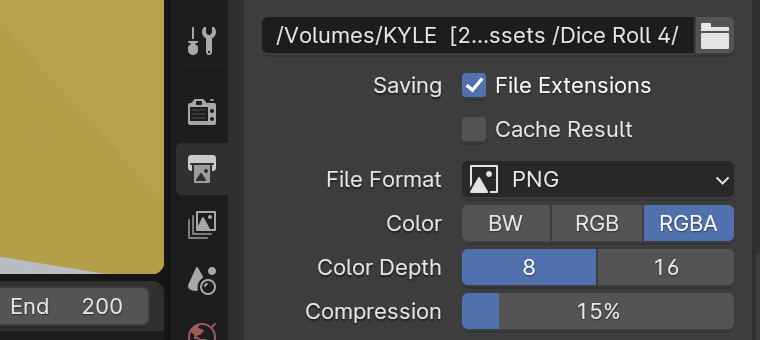
Go to the Output tab ➡️ Format ➡️ File Format ➡️ Color ➡️ RGBA.

Every frame becomes one png, then you import those as an Image Sequence in your editing software.

Here’s how the simulation looks on my end! I wound up going with a pixel look for all of the panels I filmed this time. I’m a 90s kid, what can I say? Also, pixels can help cover sloppiness in your animations and simulations…something I really appreciate about stylized aesthetics.

Acknowledgemetns

No one exists in a vacuum. Blender is notoriously confusing at first glance. Fortunately, there are a tonnnnnn of tutorials floating around to help you figure stuff out. I usually do piecemeal searches… “How do I enable add-ons, how do I make two objects collide, etc.” For this blog, I learned how to add Math Function Meshes from this tutorial by Cly Faker.

Special thanks to Charlene MacPherson from NAT20 Therapy for having me on this project!

Go forth and conquer, friends!

How to Record Your Podcast by Kyle Rebar

What do podcasts like This American Life, Science VS, & the hilariously insightful AITApod have in common? They all sound great.

I do a fair amount of freelance podcast editing and producing (see Dark Side of the Mat, the latest seasons of Starship Therapise & Voices on the Side, and The Yoga History Podcast to name a few) and I’m always fielding questions about how to set up recording software and what to do with the files.

Podcasting is time-consuming and you’re already putting in the legwork to get your show off the ground. Spending a bare minimum of time on your presentation (e.g. sound quality) will make you stand out amid a sea of warblies and your editor will thank you profusely.

Sure. You could fire up the old Zoom/Anchor/Podbean/RiversideFM meeting and use the warbly, squishy, low-bit-rate default audio that sounds like something out of 2001 Napster’s nightmares. Or… You can follow this guide and give your editor majestic and pristine high resolution audio files. It’s a lot simpler than you think.

This blog is adapted from a guide I send to my podcasting clients. I work mostly with therapists and yoga / fitness professionals whose main skill sets are not audio engineering, so I’ve tried to make this as step-by-step and thorough as possible and assume no prior knowledge.

The steps you should follow will depend on your specific set up. There’s no one-size-fits all method for every hardware / software rig. I’ve compiled the most common configurations I get asked about. We’ll cover Mac, PC, Voice Memo, Garage Band, Adobe Audition, field recorder, single guest, and multiple guests in the same room.

Audio can be a fun rabbit hole to fall into—your mileage may vary. Only get as technical as you are comfortable with and make sure you do a test recording at least once before you go live. Once you get a few reps in, it’ll feel automatic. Alright. Let’s get it!

Voice Memo (Mac OS)

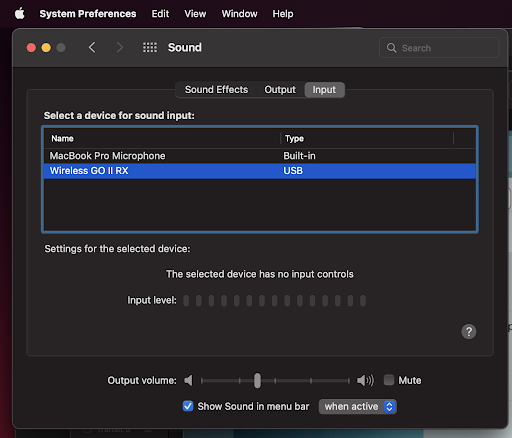
You can use Mac's built in Voice Memo app to record a high res local copy of your audio while doing a Zoom/etc meeting. First, you'll need to set your recording device. You can do that by going to your Mac’s System Preferences ➡️ Sound ➡️ Input ➡️ and select your device (YETI, USB Mic Your_Mic’s_Name, etc).

Depending on your device, you may be able to set the input level from this menu. Otherwise (like with the Yeti) you should be able to set record volume with a dial on the device (e.g. the knobs with numbers on the Yeti). 

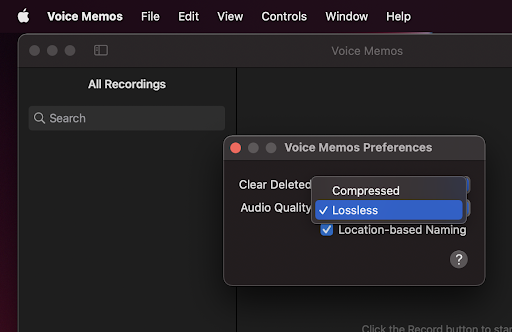
Then in Voice Memo Preferences, set the audio quality to Lossless.

Hit the big red record button, do your podcast, click stop ➡️ done. Then, drag the file from the sidebar onto your desktop and upload to Google Drive.

Audacity (Mac & PC)

If you want to use a more robust recording software, I recommend Audacity—it's a great multi-use open source audio tool. It's fully functional and has handy controls for exporting uncompressed audio, editing multritrack, saving sessions, adjusting recording and playback levels, etc.
Inside of Audacity, you'll need to select the recording device. I’m using a Rode Wireless Go II in this example.

You'll do that (on a Mac) by clicking Audio Setup ➡️ Recording Device ➡️ Rode Wireless Go II. 

When you hit the red record button, it'll record until you hit stop. The next time you hit record, it'll continue the next on the same track. So you can just hit record and keep going forward. When you've recorded everything, you can save a copy of your session (a backup of all of your clips) by doing save as, and then export the clips as a .wav. You'll do this from File ➡️ Export ➡️ Export as WAV. 

Garage Band with 2 USB Mics (Mac Aggregate Device)

Let’s say you’re having a guest on the podcast. You want to record on two mics in the same room on your Mac. You’ll need to create an AGGREGATE AUDIO DEVICE! This basically “tricks” Mac into thinking your two USB mics are one device. This is handy if you’re doing complicated music device set ups, too, but that’s way beyond the scope of this tutorial.

Connect both usb mics to your laptop. Do Finder ➡️ Applications ➡️ Utilities ➡️ Audio MIDI Setup.

From there, click the + sign in the lower left corner and select "create aggregate device."

Check the boxes for your two usb mics. The sources are color coded. My mics are stereo, so there are two input channels (a left & a right ) for each mic. Your's might just be one. Take note of the channel numbers. In this example, mic 1 will be channels 1 & 2, mic 2 will be channels 3 & 4.

Open up GarageBand ➡️ Create a New Track ➡️ Click on the Details drop down ➡️ Select Input 1 from your aggregate device. Repeat this for track 2 and select Input 2 for your second mic.

You'll now have two tracks. Right click (or cmd+click depending on your set up) ➡️ Select Configure track header ➡️ Select Record Enable.

This adds a little Arm for Recording button 🔴 to your tracks. Arm both tracks (click on the red circles), they should start flashing. When you hit the main record button up top, both tracks will start rolling with one mic on each track! GarageBand should save this setting, so you shouldn't need to do this next time you record.

You'll need to export each track separately. Mute track 2 when you export track 1, mute track 1 when you export track 2. All set!

Adobe Audition (Mac & PC)

Audition will be your most fully-featured option. IMO, it’s the easiest to use once you get comfortable with the interface.
Start by doing File ➡️ New ➡️ Multirack Session.
Use Sample Rate: 44100 hz, Bit Depth: 16 bits, Mix: Stereo. You can use higher settings if your interface supports it. This will be a great baseline. 

Check File ➡️ Settings ➡️ Audio Hardware. Select your Audio Interface as the device. I’m using a Zoom U44 in this example.

If you select System Default, it will use your computer’s built-in microphone. This will not sound good.

If you want to plug your headphones into your computer, select System Default - External Headphones. If you want to plug your headphones into the interface, select your interface.

From the multitrack session, click Default Stereo Input and select Input 1 for mic 1, Input 2 for mic 2, Input 3 for mic 3, etc. Set each track to a different input so each microphone records to its own track.

Arm each track by clicking on the little R next to the track name. Begin recording by selecting the Red Circle at the bottom of the session.

Mute track 2 by clicking the M near the track name, do File ➡️ Multitrack Mixdown ➡️ Export to export track one, Mute Track 1 / Unmute Track 2 to Export Track 2.

Select Format ➡️ Wave PCM to export full resolution files.

Field Recorder (Zoom H1 / Zoom H6 / Tascam / etc)

A field recorder is a piece of hardware that records audio files directly to an SD card in the device. This saves you the hassle of having to mess around with software and potential troubleshooting. The downside is that this set up is best for recording guests in person, though it’s all the same if you’re just recording yourself. Here’s what you do:

Plug in your mics or point at face ➡️ Adjust levels so it doesn’t sound like a tin can ➡️ Hit record ➡️ Copy files from the SD Card. Done.

That’s it! Feel free to comment any additional questions you might have. I can do a follow up post with added clarification. I will also update this blog periodically as new scenarios emerge with my clients.

Acknowledgements

I have to give a major shout out to Justine Mastin/@mindbodyfandom. Justine and I have collaborated on many audiobooks, podcasts, and remote projects over the years. She’s often the first person to test out my set up methods. She has helped errorproof and bulk out this tutorial (and my self-confidence) in so many ways. “Believe and achieve!”

Special thanks as well to Sarah Ezrin for giving me a reason to write up a podcasting guide in the first place!

Go forth and conquer!